
Have you considered video blogging?
In the age where online reality is replacing actual reality in every facet of our lives, having YOUR face behind YOUR virtual real estate is paramount for people to feel close(er) to you.
This blog post will be your comprehensive guide.
Why Video Blogging?
Video blogging helps you build connections with your viewers like no other blogging format. The close second is perhaps audio.
A case in point is Michael Stelzner. He’s the face behind your favorite business blog SocialMediaExaminer.com, and he used this method to introduce himself and his websiteto his audience in a very effective way. Have you introduced video content to your personal or business blog? If not, why?
The usual excuses given are “I don’t have the right equipment” or “it takes too much time” or “I’m not entirely sure how the whole process works.”
In this article, I’ll show you the minimal, yet crucial, amount of equipment you’ll need and the quick and dirty way of getting your videos out there in record time.
So let’s get started.
Shooting a Video
#1: Audio
It may seem bizarre to start an article about online video blogs by talking about audio, but “hear” me out. (Pun totally intended).

If the audio sucks, no-one will watch your video. Simple as that. End of story.
Even if video comes out totally terrible, you can still salvage your shoot by turning your video post into an audio post. So how do we make sure audio comes out OK?
Many low-end and certainly mid-level camcorders come with a MIC in port. Buy an external microphone, plug it in and beyond that, all you have to do is make sure your levels are decent and you’re all set.
If you have a camera that doesn’t have a MIC in, you can record the audio on a separate device and merge the audio with video in post-production.

Do you know why movie directors use the clapper (a.k.a. clapboard) before starting every scene?
Tip: You can easily sync audio and video in post-production by using your hands to clap a few times to denote the starting points in which audio and video should match up. The audio spikes will be visible in the editing software and can then be synchronized with the video of you clapping.
If you’re forced to use the camera’s built-in microphone, be keenly aware of the following two factors:
- Environmental—for example, a strong wind if you’re shooting outside and electromagnetic interference or air conditioner noise if shooting inside.
- Position of subjects—you’ll notice how on-cam MIC mostly picks up the person shooting the video while the subject who is few feet away (or further) is quite low during audio playback.
In other words, be prepared to do some post-production magic to get the audio properly leveled and equalized.
Alternatively, you can look for the magic spot through experimentation that will yield good-enough results with minimal post-production editing.
#2: Lighting
If you’re going to spend money, this is the area where most of your budget should go. If there’s one thing video experts agree on, it’s the paramount importance of proper lighting in shooting a video. In fact, proper lighting is more important than the type of camera you use. Why?
Most modern digital cameras (even cheapos) are quite serviceable and have good-enough resolution for YouTube.
Whenever possible, take advantage of natural light. Make sure the source of the light (usually sun, or if indoors it’s the window) is always behind the camera (or slightly to the side).
Here is some “lighting” terminology you ought to be familiar with before we list the types of lighting equipment you may consider.
Key Light: As its name implies, this is the “main” light. Usually placed to the right of the camera and about 3 feet above the subject’s eye level (thereby emulating downward casting naturally produced by the sun).
Fill Light: This lighting fixture is placed on the other side of the camera and its job is to “fill” the shadow cast produced by the key light.
Back Light: Placed behind the subject. This light is sometimes called “head and shoulders” light because that’s the part of the subject it ought to illuminate.
Light kit options abound, but do keep in mind that entry-level lights—while quite affordable—will only last for few hundred shoots at the most.
Trick: Proper lighting is as much a science as it is an art. Having proper equipment and a zeal for experimentation are paramount. Have fun with it and allow imperfections to slide.
No-one expects Hollywood-style production from your blog. In fact, polished videos reek of corporate subterfuge so much that even content-producers who CAN make a polished video choose not to. You can check out these videos on lighting, they’re free, authoritative and extremely useful.
#3: Camera
What kind of camera will you need to do online video? Well… what kind of camera do you have? I would definitely start there.

No need to run out and buy a new camera if you already have one sitting around your house or office.
I’ve started out with a $75.00 cam I purchased at Rite Aid, then moved on to a $300.00 cam with an external MIC-in, and now mostly shoot with the new Olympus. They all do a fine job. In fact, even a PC cam will do.
Real Life: Most of the videos I make for my Facebook dog-crew on how to use Twitter are done using a PC camera. Why? Because it’s quick and easy. The idea is to get your face out there so that clients and potential customers can see you, hear from you and “feel” like they know you.
Golden rule of sales: People buy from people they know and like.
What to consider when choosing a camera:
Video Format: Some manufacturers save the on-cam video in proprietary formats that require special software to be converted into standard video formats (.mov, .mp4, .avi, etc.). Look for a cam that natively records in the format understood by your video editing software.
Sound: Look for a cam that has an external MIC-in. See the Audio section in the beginning of the article.
Storage: I like cams that use SD cards for storage instead of internal HD. It’s a preference, but SD cards allow for easy transfer between cam and computer (no cable necessary) and I can carry multiple SD cards in case one fills up and I need more space on-the-fly.
Batteries: Some cams can only be charged via a USB or power cable while others allow for replacement batteries that are charged independently. Having a spare battery for extended shoots comes in handy.
Size: The best camera is the one that you’ll actually use. So a small cam (iPhone or Flip Cam) that fits in your pocket and can be used on a moment’s notice may be exactly what you need. Otherwise, be prepared to carry your equipment with you wherever you go.
Beyond these five points, just make sure you can afford the cam and look for one that can be mounted on a tripod in case you need that functionality (most bloggers will at some point).
#4: Screen Capture
Who said you even need a camera to produce your next video post?
You can use software like Camtasia (for PC) and ScreenFlow (for Mac) to capture your computer screen. Combine it with an audio track and you can create visually rich and useful instructions for your viewership.
Tip: I strongly recommend you wear a pair of headphones with a mic while recording the accompanying audio track. This will eliminate the bulk of the ambient noise.
- Learn how to use Camtasia
- Learn how to use ScreenFlow
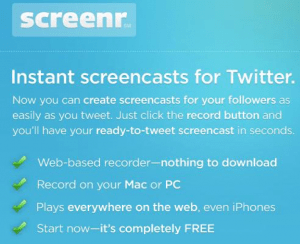
Honorable Mention: Screenr is a Twitter-integrated free online service that allows you to create screen casts. It’s quick and dirty and exactly how I like ‘em.
Editing a Video
(don’t edit if possible)
#5: Editing on YouTube
If at all possible, for the sake of speed and simplicity, don’t edit your videos.
The next step up from there is to edit (trim) the very beginning and the very end. In fact, you can do this on YouTube.
Trick (sort of): You’ll need to have your video uploaded and sign in with your Google/YouTube credentials.
Confession: YouTube has had a checkered past with online editing. The feature was available a while back but it was pulled due to molasses-on-a-cold-day qualities of its “speed.”
Now that YouTube is owned by Google, the powerful infrastructure is there to support simple editing capabilities. No, this feature is not part of YouTube-proper, but it’s available under the “sandbox” area which can be accessed here.
YouTube has a really good help section that gives you the basic info you need to create effective videos, from formatting and editing to lighting and split screens.
Trick: Make sure your URL is the first line in the description of the video. This will make it easy for people to locate and visit your virtual real estate. See the link here as the very first line in the description field below.
Optionally, you can embed your website’s URL in the video itself; however, you’ll need to use a locally installed video editing app to do this. See next section.
#6: Editing Using Locally Installed Apps
MovieMaker (on Windows) and iMovie (on Mac) are free and quite serviceable.

- Learn how to use MovieMaker
- Learn how to use iMovie
If you don’t mind spending a few hundred bucks, my favorite apps for editing a video locally are Camtasia (for PC) and ScreenFlow (for Mac).
Trick: Yes. The same apps that allow you to capture your screen also allow for basic (but sufficient) video editing as well.
These two apps are quick, easy and intuitive. Here are the links to those tutorials again.
- Learn how to use Camtasia
- Learn how to use ScreenFlow
More advanced solutions include Final Cut (Express and Pro versions) for Mac and Sony Vegas Studio HD for PC.
I would be remiss if I didn’t mention a great (and free) online training resource for Final Cut.
Check out this course by Israel Hyman. The course consists of 16 wonderful and free video tutorials.
Larger Implications: The subtle implication of all this is that if it feels like the days of specialization are over, well… you’re right.
Specialization is a concept invented by the cogs of the industrial revolution and it’s NOT a natural state of the human psyche.
Imagine if Leonardo da Vinci specialized only in art. The world of science and architecture would have a gaping hole in it.
My point?
We all need to become jacks of all trades and masters of few. It’s not enough to be an amazing real estate agent or a photographer; you must also become an effective content producer.
Distribution Channels
#7: YouTube
YouTube is the second largest search engine. That should speak volumes in terms of the significance and importance of having a presence on YouTube.
The other important factor is that YouTube is a social networking site on par with Facebook. You can make friends on YouTube (subscribe to channels) and others can make friends with you (subscribe to your channel).
YouTube allows you to tag your videos, share them easily on other sites (Twitter, Facebook, etc.), and it’s as socially integrated as a site gets.
There are two very solid arguments to focus your strategic efforts ONLY on YouTube (basically ignoring other platforms like Vimeo).
YouTube is the largest and arguably best integrated with Google and other colossal Internet hubs (in fact, YouTube IS an Internet hub of its own). If mastering multiple platforms seems like an overwhelming task, you would be well-advised to focus your blogging efforts on YouTube alone.
OK, Dino. I hear what you’re saying. But what kind of things should I put on YouTube anyways?
#8: Other Distribution Options
blip.tv
blip.tv is not your average bear. The focus is on episodic content and the unique feature of blip.tv is that it can distribute your episodes to other video distribution sites (like YouTube, Vimeo, etc.).
Assuming your content qualifies, your episodes can be viewed via cable service providers (on TV) who’ve partnered with blip.tv.
Vimeo
Vimeo was established in 2004 (one year before YouTube) and it’s a solid alternative to YouTube geared toward skilled content producers. Vimeo doesn’t allow commercial, gaming or pornography videos; or anything NOT created by the user to be hosted on the site.
As per Wikipedia: As of March 2010, Vimeo has over 3 million members and an average of more than 16,000 new videos uploaded daily. Roughly 10% of uploads are in HD.
Honorable mention: TubeMogul can distribute your videos far and wide (to other video distribution hubs like YouTube, Vimeo, etc.) and provides powerful statistical analysis and even geographic tracking. Most advanced features are pay-to-play, of course.
The Secret Sauce
#9: Blog/YouTube Integration
This section is strictly for owners of self-hosted WordPress blogs. I will recommend 2+ WordPress plugins that are seldom used yet provide a powerful integration between your blog and YouTube.
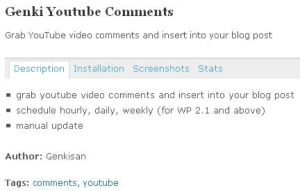
Genki YouTube Comments plugin
After uploading your video to YouTube, you did remember to embed it as a blog post in your piece of web real estate, right?
If your tags are useful, your descriptions accurate and your content fascinating, you’re likely to receive comments on it. Why not “feed” those comments back to your blog using Genki?
Smart YouTube
Smart YouTube is a WordPress YouTube plugin that allows you to easily insert YouTube videos/playlists in your post, comments and in RSS feeds.
But wait…there is more…
The success of your videos will depend not only on the quality of the content. Your video blog should be easily shared and content seamlessly posted on other social hubs (like Facebook, StumbleUpon, etc.).
To that end, you may want to consider these additional useful plugins:
- 24 Impressive WordPress Plugins
- 11 Essential WordPress Plugins
#10: When You’re Ready to Go Pro
This entire post was focused on the do-it-yourself crowd. When you’re ready to go pro and enlist help from people who have the deep know-how, there are three people whose work I’m personally familiar with and wouldn’t hesitate to recommend.
Full disclosure: While I’ve worked in one capacity or another with two of these content creators, it was strictly a labor of love and no money has exchanged hands at any time.
TWTMedia
TWTMedia is Tony Brokenborough, the man and the brains behind 2wheeltips.com(Facebook-like social site for motorcycle enthusiasts with a heavy educational slant).
Here are a few challenges Tony has had to overcome that you might benefit from if you enlist his services:
Motorcycle videos present a unique challenge in terms of not only shooting but also post-production stabilization processing due to vibrations introduced by the motorcycle.
One of the major drawbacks of having your videos hosted on YouTube is that YouTube might end up playing your competitors’ ads over your video content. You have no control over this and it can prove to be a case of your content working for your competitor.
Tony has figured out how to have complete and total control over the video content to the extent where he is playing the role of YouTube-like service to websites that feature his high-end quality motorcycle videos—and Tony is the one “feeding” the ads.
TWTMedia also specializes in Facebook fan page customization, particularly in the realm of Facebook/video integration.
Graphic Planet
Graphic Planet is Kenn Bell. If you decide to visit The Dog Files (Kenn’s labor of love and an effective showcase for his skills), you’ll find TV-ready 10-minute episodes, production values of which are head-and-shoulders above your average video blog.
In addition to creating killer video content, Kenn really knows how to tap into the power of the niche. Kenn’s latest video honoring Hero Dogs of 9/11 blew up among dog people.
Over 100,000 views (in less than 2 weeks) and 4000 of his closest Facebook friends shared his video on their Facebook walls.
Kenn’s magic is that he’s able to take your modest budget for a video shoot and churn out an episode that looks like a million bucks.
Last but certainly not least is…
Dan Perez Films
Dan’s work is awesome. It’s fresh, fun and addictive. Check out the brains behind Dan Perez Films video.
It doesn’t take much to fall in love with Dan’s video creations. I guess the fact that he’s an award-winning filmmaker, video producer, father and husband to a rock star doesn’t hurt either.
All three of these gentlemen are not only amazing content creators whose medium happens to be video, but all three have a deep understanding of the social media space and can help your company develop the right strategy for online video distribution.
#11: Bonus Tip: Skype, Skype Baby
One of the most underutilized methods of creating video content is having a sit-down with an expert in your field and recording the entire conversation. However, experts are often far away and that can present a challenge. In comes Skype.
Trick: In addition to Skype, you’ll need an application that can capture streaming video/audio.
Two apps I’ve used are:
- Call Recorder for Mac
- Super Tin Tin for PC
You can schedule a Skype interview with someone on the other side of the planet and record the entire conversation. What a great way to develop content and provide a service to your viewers as well as a platform for the expert. Because the interview is recorded, you can edit audio and video in post-production, trim the fat, add an intro if necessary and fine-tune the audio levels.
Here is a Skype interview Tony and I did with motorcycle legend David Hough using Skype and Call Recorder.
Honorable mention:
wetoku allows you to record and share a conversation between two people. The drawback is that you don’t have as much editing control over the content.
What do you think? I’m sure there’s an amazing resource, application or perhaps a technique that I’ve missed. Something you’ve had experience with and found tremendously useful. Add your thoughts in the comments box below.
Image sources: Flickr, Wikimedia, Flickr